Succession Planting for Beginners

How to Build a Thriving Garden that Supplies Everything for You by Leveraging the Power of Succession Planting Step by Step

Introduction

Like most people with a passion for self-sustenance by growing their food, you may be struggling with a few prevalent home gardening problems and shortcomings that you can’t seem to get on top of:

For starters, you may be scratching your head with concern over how you can utilize your limited garden space more efficiently, so you’re able to plant all the crops that you desire, or at least most of them.

You may also be keen to learn how to extend your harvesting season. That way, rather than having your farm produce come in all at once and potentially overwhelm you or force you to give and throw away a portion of it, you have smaller, more manageable, steady harvests rolling in. A steady stream of farm products will ensure you can enjoy everything your garden produces without it going bad, giving you a chance to enjoy fresh produce over a longer period.

If, like most home gardeners, you’re struggling with these issues and more, then succession planting is the all-in-one remedy package you’ve been looking for.

Simply put, succession planting will help you get the most out of your garden and then some. It will help you fit more plants in the same space, enabling you to plant all, or at least most of the plants you desire.

Its techniques will ensure that you enjoy extended harvests and fresh produce over a longer period. You will pair up crops that complement each other, giving them a  chance to grow faster and stronger, owing to the support they give each other.

Succession planting will improve your yield and produce quality; better yet, it will enable you to enjoy fresh produce all year long, be it in the harsh summer heat or the bleak cold of winter.

You will no longer have to do all your planting in spring and then sit on your haunches waiting for next year’s spring to come along. Does all that sound too good to be true?

Well, it really isn’t.

This book delves deep into succession planting, outlines its benefits in great detail, and provides a step-by-step manual on its methods, techniques, and so much more.

After reading this guidebook, you will be well on your way to mastering succession planting.

Let’s get started:


PS: I’d like your feedback. If you are happy with this book, please leave a review on Amazon.

Please leave a review for this book on Amazon by visiting the page below:

https://amzn.to/2VMR5qr 

Table of Contents

Introduction

Chapter 1: What is Succession Planting?

Chapter 2: Why Do It?: The Benefits of Succession Planting

Chapter 3: Succession Planting Method 1 – Same Crop, Staggered Plantings

What is Staggered Planting?

What Plants Are Best-Suited For Staggered Planting?

How Does Staggered Planting Work?

A Few Tips for Staggered Planting

Chapter 4: Succession Planting Method 2 – Different Plants, Same Space

Chapter 5: Succession Planting Method 3 – Intercropping

How To Practice Intercropping for Maximum Yield and Quality

Chapter 6: Succession Planting Method 4 – Same Plants, Multiple Varieties

Tips to be Successful with This Particular Practice

Chapter 7: 19 Plant Candidates for Succession Planting & the Maximum You Can Do with All of Them

Chapter 8: Extending the Season

Chapter 9: Square Foot Gardening

What is Square Foot Gardening?

The Basic Setup

Benefits of Square Foot Gardening

Growing on the Grid

What About Perennial Veggies?

Fancy Footwork

Square Foot Layout Tips:

Chapter 10: Succession Planting Dos and Don’ts

Succession Planting Dos and Don’ts

Conclusion

Chapter 1: What is Succession Planting?

Let’s start by answering the question: What is succession planting?

In agriculture, succession planting, also called multi-cropping in some circles, refers to a cluster of planting methods that help to increase crop yield and availability throughout a growing season through making innovative, as as well as efficient use of timing and space.

For preciseness, succession planting involves planting one crop at different times/dates or planting different crops with different maturation periods in the same space at the same time. Doing this ensures you do not harvest everything at once and risk having too much fresh produce in your hands at once.

For instance, you can plant a small amount of lettuce one week, then wait a couple of weeks before planting some more. Or you can plant a little lettuce, a little broccoli, and some potatoes simultaneously. Both succession planting strategies result in a spread-out harvest that will allow a steady, fresh supply over a longer time period.

There are 4 basic approaches/methods, which are also combinable. We’ll highlight them below and, later in the book, dedicate a separate chapter to discussing each one of them.

They are:

  1. Two (or more) crops in succession: With this approach, after harvesting one crop, you promptly plant another in the same location. The duration of the growing season, the environment, and the crop choice will all be important considerations you need to have. For instance, you could follow up a cool-season spring crop with a heat-loving summer crop.
  2. Same crop, successive plantings: Rather than planting everything at once, you conduct smaller plantings regularly. The plants mature at different times, allowing you to have a continual harvest over a longer, extended time period. The use of this method is common with lettuce and other salad greens. This strategy is excellent if you have to make do with a small garden or home garden since it avoids the enormous initial production of the crop and instead provides a constant, lesser output that’s consumable in its entirety. You may also hear it called relay planting.
  3. Two or more crops in tandem: Here, you plant non-competing crops in various patterns, with all of them having different maturity dates. One such pattern technique is intercropping, with companion planting being a similar, complementary strategy to intercropping.

Interplanting is a term used to describe the technique of cultivating two different types of plants in one space. Interplanting will require you to have some degree of forethought and understanding of the different varieties of vegetables’ maturity periods. Your best bet for successful interplanting and intensive gardening will be the use of raised beds. This will be covered in detail later in the book.

Something else you need to know is that planting two or more non-competing crops has the potential to raise issues with soil-borne diseases and pests, most of which may only affect one type of plant. Therefore, it is necessary to research before deciding which crops to interplant.

  1. Same crop, different maturity dates: With this one, you will choose several varieties, all of which have different maturity dates: early, main season, and late. After you plant them at the same time, they will mature one after the other as the growing season unwinds.

Using the strategies above, you can design complex, high-yield cropping systems, and we will look at this later in the book. Keep in mind that the more complicated the design, the more necessary it is to understand certain kinds and how they function in a given growing environment.

Due to the different climatic and soil conditions observed across the US and the world, there are significant discrepancies in succession planting instructions from state to state and from country to country.

For example, if you live in Alaska, you will need to abide by a different set of instructions than someone trying succession planting in Arizona. Warm weather succession planting bears vast differences to cold weather succession planting, and we shall cover all this in some depth later.

Although the techniques apply to any scale, the term “succession planting” is commonly used in literature to describe home gardening and small-scale farming. However, this is not always accurate as some home gardeners and small-scale farmers do not incorporate succession planting techniques.

You may come across some definitions of succession planting that incorporate one or more of the four strategies listed above, but not all of them. Some definitions even say that intercropping is a standalone entity, not necessarily a method of succession planting. However, intercropping is widely recognized as being part of succession planting.

One other thing to take note of is that while organic farming frequently dips into succession planting methods and techniques, they aren’t necessarily the same and organic farming isn’t necessarily tethered to succession planting. There’re plenty of long-time organic farmers, especially those who have larger farming spaces to work with, who do not incorporate succession planting techniques and instead use more conventional, less efficient crop-growing methods.

Before we delve into the more technical aspects and elements of succession planting, including greater coverage on its four main methods, it is key that you ask yourself these questions:

  • Why do it?
  • Why not just do things the conventional way?
  • Is succession planting all that it’s hyped up to be?

The next chapter gives you the answers to all these questions.

Chapter 2: Why Do It?: The Benefits of Succession Planting

While having a spread-out harvest is by far the best-known benefit of succession planting, it is certainly not the only one. Far from it, in fact.

Many other benefits to succession planting may not be as obvious as simply having a spread-out harvest but are just as appealing to home gardeners and commercial growers alike.

These benefits are outlined below, and they make a great case for why succession planting is a must-do as someone with a passion for growing produce:

1) Efficient use of garden space

You will grow a variety of veggies and fruits throughout the year by using succession planting. Crop rotation, which involves substituting one plant species for another at different times of the year, achieves a similar result for commercial farmers. This is also something you can accomplish in your home garden.

Apart from consistent harvests, another significant benefit of succession planting you will enjoy is the capacity to squeeze more productivity out of limited space and time. Let’s consider Maine as an example.

Knowing Maine has a relatively short growing season, your fellow gardeners will be quick to let you know that you’ll be lucky to get a singular harvest of long-season crops like peppers. If you tell them that you’re looking for a second and third harvest of the same, they’ll laugh at you and tell you to forget it. But how can you hope to get a 2nd and 3rd crop of long-season crops in areas like Maine and further south? 

The answer is through careful planning and the adoption of cold-hardy crops. Melons, for instance, cannot be planted before Memorial Day (unless you have complex frost protection measures in place), so there will be several weeks between snow-go and melon planting, a time period when frost is expected. However, you can take advantage of the space with cold-hardy crops. Let’s say you seed early lettuce in that cold ground – lettuce will be perfectly fine in the cold weather; the only key thing is that it will grow slowly at first before picking up. The crop will likely be completely out of there by the time conditions are ideal for melons, especially if you planted leaf lettuce.

2) Fresh vegetables can be in season for a longer time

This one is pretty straightforward.

If you stagger your plantings, you will enjoy a steady supply of fresh veggies throughout the harvest season. By the time you polish off the first harvest, a second crop will be on the wings, ready for picking.

3) Exposure to multiple varieties of vegetables

If you are only used to crops grown in the summer —leafy greens, summer squash, sweet corn, tomatoes—, preparing for an autumn harvest will introduce you to new vegetable varieties like Brussels sprouts, carrots, and kohlrabi, and winter crops like winter squash and onions.

4) Weed Control

Let’s say you’re planting lettuce and plan to sow small amounts every week or two for the next month or so. You clear the entire patch you plan on planting your entire lettuce seed haul in, then set about making weekly or biweekly plantings.

Because you’re only planting a small amount of lettuce at once, you’ll leave a patch that doesn’t have any lettuce planted in it. Also, you’ll allow the patch with lettuce to “stale seedbed” for the next week or two (basically, allowing the planted seeds to germinate as you await the next round of planting.)

If weeds grow in the empty space where you plan to plant the next crop, you can easily take them out by light cultivation. This certainly beats plucking weeds from between your lettuce plants, had you planted all of them at the same time, and will save you a lot of energy and time.


5) Pest and Disease Control

You don’t always know which diseases or pests will take root when you initially plant a crop. With succession planting, on the other hand, you can identify where your pest and disease problems lie, which will go a long way in helping you make vital decisions.

All of your prior plantings will show you how serious a disease or insect problem is and how effectively you should safeguard the subsequent crop before planting. If you observe a lot of cucumber beetles on the 1st round of cucumbers, for example, you know the second cycle will require extra protection right away. Knowing the active diseases can help you decide what to grow, where to plant it, and how to safeguard it.

6) Fertility Control

You may check for deficits and overall plant vigor once you’ve planted your first batch of crops. If a crop seems not to be taking off as it should, you may need to supplement the soil before planting the second phase. Before using any chemical fertilizers, conduct a soil test, although well-made compost will nearly always benefit whatever crop you plant.

Another way that succession planting might help with garden fertility is as follows:

Depending on the crop, you may slip a cover crop in between plantings. This keeps beneficial bacteria in the soil, keeps the soil in place, and keeps weeds at bay all while adding organic matter to the plot. This may not be appropriate for crops harvested every week or two, but if you want to space out your cucumbers, tomatoes, or other similar crops, introducing a cover crop will be a good idea and will certainly be a bonus to the soil.

With the benefits covered, it’s time to look at the four main succession planting methods. Each method will have a separate chapter dedicated to it. Chapter 3 looks at staggered planting, what it entails, and the ideal plant candidates for it.

Chapter 3: Succession Planting Method 1 – Same Crop, Staggered Plantings

Growing your own food is one of the most empowering things in the world. It also saves quite a few bucks in grocery bills, so there’s that.

However, when a harvest overtakes your kitchen, compelling you to sneak kohlrabi into book club meetings and forcing them onto your friends, or leave handwritten zucchini calling cards on unsuspecting neighbors’ doorsteps, you can start feeling a little regretful of your neat homegrown crop rows, especially when you know a good amount of your fresh produce will go to waste.

Being overwhelmed by a windfall of fresh produce is in no way the worst thing that could happen to you, but it’s a problem nonetheless, and you’ll be better for it – not to mention you’ll waste far less – if you can avoid it. Enter staggered planting, the perfect solution to this particular issue.

It is one of the four major succession planting methods and is the most popular one out of them all. This chapter looks deeper into this method and recommends plants suited for this particular succession planting method.

What is Staggered Planting?

Staggered planting is a technique where you plant small amounts of the same crop at different periods, with successive plantings taking place, say, one or two weeks apart.

For example, rather than plant all of your lettuces or radishes at once, you plant a small number of seeds every week or two, over a month, until you plant your entire seed haul. This way, you can stretch your harvest and keep it rolling in at a moderate pace.

What Plants Are Best-Suited For Staggered Planting?

1) Staggered planting is ideal for crops that mature all at once, such as beets, leaf lettuce, salad greens, spring onions, turnips, radishes, and carrots, for obvious reasons.

2) It is also ideal for crops prone to diseases and pests because it provides a great workaround by allowing you to have successive harvests to look forward to, should pests and diseases decimate the prior rounds.

The first round of crops will also alert you to the seriousness of pests and diseases, allowing you to foreplan and take appropriate measures for the subsequent rounds.

Cucumbers, bush beans, and summer squash, such as pattypan, zucchini, and crookneck squash are in this category —basically, anything that squash vine borers like to feed on.

Image showing squash vine borers

3) Melons are great candidates for staggered planting. They do require a long growing season to mature properly, but you do not want to have 15 watermelons mature at once unless you have a lot of cold storage space. Ideally, you should stagger three melon plantings by 5 days for an easily manageable harvest that allows you to relish all the (literal) fruits of your labors.

4) Flowers are great candidates for staggered planting as well. Stagger planting one-flowering-stem wonders like gladiolus ensures that the flowers continue to bloom throughout the season, which, at the very least, is a nice thing to have. Calla lilies, bachelor’s buttons, and zinnias are ideal flower selections for staggered plantings.

Image showing gladiolus

Image showing calla lilies

Image showing bachelor’s buttons

Image showing zinnia flowers

How Does Staggered Planting Work?

Staggered planting is quite straightforward. You simply estimate how much of a crop you generally use in a typical week and then plant that amount every passing week. You need to ensure all your crops, especially those in the final round of planting, have enough time to ripen and yield a harvest before their ideal growing window passes.

As such, you will need to make basic timing calculations, largely based on your growing season’s mean temperatures. Generally, though, you will sow your seeds every 10 to 28 days, although this is dependent on the crop you’re working with.

Adapt the standard planting schedules below to your specific growth environment for best results:

  • Peas and bush green beans: every 14-21 days
  • Lettuce, onions, peas: every 10 days
  • Cucumber and summer squash: every 21-28 days, with smaller plantings following the first big one
  • Turnips and radishes: every 10-14 days
  • Basil: every 14 days
  • Melons: every 5-10 days

A Few Tips for Staggered Planting

  1. Stock up on your seed supply in spring. If you want to grow crops for fall harvest, stock up in the spring when seeds are widely accessible and not as expensive as is the case with other seasons.
  2. Before starting, make all necessary changes and improvements to the planting sites to ensure you do not disrupt any presently growing crops when sowing new ones.
  3. Grow your seedlings for future plantings in tiny pots for summer plantings. This will help save money you could have spent on a fresh batch of seeds to plant. Do so especially for basil, squash, and cucumber, as their seeds tend to be on the higher end, price-wise, in the summer.

Next up, we look at the second of four succession planting techniques: pair up planting, aka different plants, same space.

Chapter 4: Succession Planting Method 2 – Different Plants, Same Space

No matter how big your veggie patch is, there never seems to be sufficient space for everything you want to grow. This is especially true if you’ve overspent on transplants and seeds, which is all too easy to do.

Pair-up planting and intercropping are two succession planting strategies that might help you fit more into your garden. This chapter will cover pair-up planting, while the next one will cover intercropping.

Pair-up planting is phenomenal that allows for the efficient use of garden space. You may still not manage to plant everything you’d like to plant, but you’ll certainly get a lot further with what you can manage to fit into your garden space.

However, you want to be careful with which plants you pair up in your garden. You do not want two space hogs vying for the same amount of space, sunlight, water, and soil nutrients.

In a bad pairing, one crop is more likely to win out over the other, to the detriment of the losing plant, of course. Choose complimentary partners for your crops to guarantee that they can coexist happily.

Here are some tips and strategies you can implement when practicing pair-up planting:

1) Nail down your planting timing and strategy

Large vegetable plants —like cauliflower and cabbage— may need planting early in the season, but they will not begin to fill out for at least 6 weeks. You can seed swiftly maturing veggies like lettuce, spinach, arugula, or beets in the spaces between them while they’re still little. These quick-growing delicacies can be picked as needed and will be out of the garden by the time your cabbages and cauliflowers fill out.

In the meantime, they will serve as a live mulch, keeping the soil wet and discouraging weed growth. Annual herbs like dill and cilantro are another good filler choice because they wane after a few months of growth and harvest.

Bush beans are a fast-growing plant you can plant between slower-growing plants such as peppers and tomatoes. You can harvest and remove the plants once the beans have matured and the peppers and tomatoes have begun to fill in. Beans provide the extra advantage of injecting and leaving nitrogen behind in the soil, which is perfect for nourishing the remaining plants.

Here is a list of fast and slow growers:

  • Fast growers: Arugula, broccoli raab, beets, beans (bush), carrots, mizuna, green onions, lettuce, spinach, radish, and tatsoi
  • Slow to fill out: Broccoli, collards, corn, Brussels sprouts, cauliflower, kale, cabbage, and tomatoes

2) Shade is your friend; utilize it

Another pair-up planting technique that will help you make efficient use of your garden space is taking advantage of the partial shade provided by tall plants by planting crops that do not need full sun next to them.

Tall tomato and corn plants, for instance, thrive in a warm, sunny area. They create a shaded space behind or under them, which is ideal for growing lettuce or beet seedlings. Squash, melon, and cucumber trellises also provide a great screen for plants that need some shade in the summer.

Here are some veggies that can grow in partial shade: Arugula, Swiss chard, beets, lettuce, endive, mizuna, pak choi, mustard, spinach, radishes, and tatsoi

3) Utilize Different Heights

There is an indigenous intercropping practice called the “three sisters,” which involves planting pole beans, corn, and squash in the same space. The pole beans are supported by the corn, which typically grows tall. The beans help the corn, which is a heavy feeder, by enriching the soil. Finally, the squash acts as a live mulch, covering the surrounding ground and protecting the corn and beans from prowling animals with its prickly leaves.

This technique also works very well with root crops. Onions, carrots, and rutabagas, for example, require little space below ground and even less of it above ground. You can squeeze them into spaces between any number of plants, such as cabbage, peppers, broccoli, and kale. You can also plant them in closely spaced rows, along the margins of beds, or just intersperse them in any nooks and crannies available in your garden space.

You’ll be surprised at just how much produce your small garden can hold if you are willing to abandon the concept of planting crops in rows or blocks and instead use this technique.

Here are some plant combinations with different heights that you can combine in your pair-up planting setup:

  • Tall vegetables: Corn and tomatoes
  • Short vegetables: Arugula, Swiss chard, beets, lettuce, endive, mizuna, pak choi, mustard, spinach, radishes, and tatsoi
  • Climbing vines: Beans (pole), melons, cucumbers, squash, and peas
  • Spreading vines: Cucumbers, squash, melon, and sweet potatoes

Chapter 5: Succession Planting Method 3 – Intercropping

Intercropping is the practice of planting different crop varieties in the same space, at the same time, in the same season. This is in stark contrast to monoculture farming where the same crop is cultivated across multiple hectares of land - think of the sprawling cornfields of middle America, spreading out as far as the eye can see, with no seeming end in sight.

Intercropping differs from pair-up planting —covered in the previous chapter— because while pair-up planting typically has you pair up two different crops, you can have more than two crop types in your intercropping setup. However, both practices have numerous similarities, and you will not go wrong with incorporating pair-up strategies and tips into your intercropping setup.

Intercropping approaches differ significantly from other cropping styles regarding the layout, sowing dates, and plant combinations you need to consider as a farmer.

For instance, unlike monoculture cropping, intercropping allows you to plant annuals alongside other annuals or perennials, allowing for variety and a lot of flexibility. Perennial-perennial pairings are also possible with intercropping.

The only stipulation, much like pair-up planting, is that it is important to consider your plant combinations with great care and consideration to prevent a situation where different plant varieties compete for resources instead of complementing each other.

When different plant varieties complement each other as they grow alongside each other, we say they have a positive symbiotic relationship. When the opposite is true, we say they have a negative symbiotic relationship. You want your plant combinations to have a positive symbiotic relationship so that your yield is bigger and overall crop quality better.

A good example of a perennial-annual combination is tomatoes and garlic. If you live in a more tropical region, banana and coffee make for a phenomenal perennial-perennial combination.

How To Practice Intercropping for Maximum Yield and Quality

Here are some great tips and strategies that will help you make fewer mistakes in your intercropping setup and ensure you get yields that are plentiful and top quality:

  • When it comes to choosing a winning crop combination when intercropping, there are a few things you should have in mind. Typically, it is best to have a primary crop and a secondary crop in your intercropping combination. Having your main cash crop as the primary crop generally makes for a good choice.
  • It’s best not to group plants from the same. The goal of intercropping is to promote symbiotic interactions between diverse types of plants, which will benefit both crops and the soil they’re growing in. Planting plants that are similar to each other, thus, only defeats the purpose. Intercropping broccoli and cauliflower, for instance, is not a smart idea because they are members of the Brassicaceae family.
  • Choose plants varieties that have similar water requirements but different root systems. This makes irrigation easier for you and ensures that your plants do not compete for root space underground.
  • Carefully consider how the plants in your intercropping setup may affect each other’s exposure to sunlight. Shade is not always a negative thing, as we highlighted in the previous chapter, but it just might be, depending on the plant.
  • Time-sequencing can be highly beneficial to your overall setup because pairing plants with differing growth rates ensures that they won’t interfere with each other at critical stages of development.
  • Try and include plants like legumes, accumulators, and green manures in your setup. These are excellent to include in intercropping combinations as they help to steadily revitalize soils because they absorb nitrogen from the air and transfer it to the soil and root tips of the plants. This quality is what makes them known as “nitrogen-fixing plants.”
  • If you can, include plant species that help repel pests and insects, such as culinary herbs. Onions and carrots, for example, do very well when planted alongside culinary herbs, as they become less of a target for pests.
  • Consider incorporating the “three sisters” method in your garden. It is a Native American practice where corn, beans, and squash are planted in mounds together. The pole beans are supported by the corn, which typically grows tall. The beans help the corn, which is a heavy feeder, by enriching the soil. Finally, the squash acts as a live mulch, covering the surrounding ground and protecting the corn and beans from prowling animals with its prickly leaves.
  • Radishes and carrots are a phenomenal combination as well. Both have comparable growing requirements, and the fast-growing, fast-emerging radishes will mature first, being ready for harvest by the time the slower-growing carrots start to require more room to grow.

Next up is the 4th method of succession planting – Same crop, multiple varieties.

Chapter 6: Succession Planting Method 4 – Same Plants, Multiple Varieties

As the name implies, you will plant different varieties of the same plant, all of which have different maturation dates in your garden. You can plant early, mid-season, and late-season kinds of the same crop if you choose your cultivars intelligently, which will provide for a longer and more bountiful harvest as well as some fun flavor and appearance variation.

If you grow early, mid, and late-season potato varieties, for example, you may harvest potatoes throughout the year. Early potato cultivars differ in texture, size, color, and flavor from late-season potatoes.

Like many people, you may have a hard time choosing between varieties when you’re selecting seeds to plant; use this as an excuse to try more than one variety, with the added perk of enjoying an extended harvest window.

Planting multiple strains of the same species decreases the chances of an entire crop getting destroyed by naturally occurring variables like disease, weather, or pests that you may be unable to do anything about despite taking the appropriate precautions for them. You can select varieties with varied disease resistance and frost tolerance qualities and different growth patterns.

Having several varieties with varied maturation ranges provides extra insurance that at least one cultivar will succeed.

Tips to be Successful with This Particular Practice

With this method, keep in mind the following tips and ideas:

  • If you plan to overwinter plants in hoop houses (covered in detail in Chapter 9), be sure to have enough seed to sustain you through the season and well into the fall. You can store some seeds for several years; with others, you must use them right away to ensure proper germination.
  • Between plantings, apply some compost or leaf mold to your beds to keep the soil full of nutrients.
  • Don’t be afraid to discard plants that are past their prime. Use these plants while they’re still at their best, and then use that planting space with something else.
  • If you are an avid seed starter, you can start new transplants in mid-spring after moving out the initial batch. As the first plantings wind down (or get devastated by bugs), the summer squash and cucumbers grown in May or June will be ready to transplant. Seed your fall greens, such as kale and chard, to grow indoors or in a protected area once you have your cucumbers and summer squash transplanted.
  • You can still start veggies that thrive in cooler temperatures in the summer, but you need to cool the soil before you plant your seeds. The easiest way to do this is to thoroughly soak the designated planting space and then cover it with a wide board for three days before planting. Lift the board to sow your seeds, water again, and then replace it on top of your freshly sown row. Make sure to perform daily checks for germination, and as soon as you see the first signs of green, remove the board.

With the four main methods of succession planting covered, the next chapter will look at succession planting plant candidates for you. We shall cover 19 of them, including what you need to do regarding planting techniques, combinations, and other tips and tricks to guarantee maximum yield and crop quality.

Chapter 7: 19 Plant Candidates for Succession Planting & the Maximum You Can Do with All of Them

The following list outlines ideal plant candidates for succession planting and the maximum you can accomplish with each crop. However, this is only a guide. Don’t be afraid to alter the tips and recommendations for each plant according to your specific needs and priorities.

With this said, you can lean on the guidelines provided here with full confidence, knowing that they will guarantee that you have the particular vegetable you’re planting throughout the year. Otherwise, draw up a customized planting schedule if you only want it at a particular time in the year and not full-time.

With this said, here are 19 plant candidates and what you should do with them to ensure high yield and quality:

1) Lettuce

You can use either seeds or transplants to grow lettuce. Seed-grown lettuce, such as mesclun, is commonly grown in rows that you can remove and re-grow a few times. Transplanted lettuce can be grown to produce full heads like store-bought, seeded lettuce can.

For a continual yield, both kinds require weekly or biweekly planting. You can grow cut greens from seed in mid-April to mid-August and transplant complete heads starting from late April to early May to early August.

Some gardeners prefer to transplant a few seeds and plants to a different location at the same time, resulting in two generations of lettuce and two kinds of salad greens. If you believe this strategy will work for you, you can adopt it.

It’s best to pick out the chopped lettuce once it turns bitter in the intense summer heat, supplement the soil with compost, and plant a different crop. If your objective is to have fresh lettuce all year long, it should be easy enough to accomplish if you’re prompt in replanting it once you complete harvesting. You can even buy a few lettuce plants, keep them in pots in a shaded area, and plant a couple each week. You could also sow your lettuce in pots or trays and use the same procedure.

It is best to grow various lettuce types instead of just one variety. Grow cold-tolerant lettuce for springtime and fall plantings and heat-tolerant lettuce for mid-summer plantings. This way, you will have an extended harvest window, enabling you to enjoy fresh lettuce for a longer time.

2) Cilantro

Cilantro’s growth patterns are extremely similar to lettuce. Cilantro experiences bolting —when a plant grows up to a certain point and then goes to seed.

In the intense heat of summer, cilantro will bolt more rapidly, but in the cool fall weather—even early winter—it will remain available to harvest for multiple weeks. It’s thus a good idea to time your cilantro to ensure it is ready for harvest before the solstice on June 21st and then plant some more after that.

Like lettuce, you can grow it from seed or transplant it. Like lettuce, too, it’s quite easy to conduct both in tandem, providing you with two generations of produce. Cilantro seed is coriander, so if you like its flavor, it will certainly have a use in your kitchen.

It’s important to understand that there is absolutely nothing you can do to stop cilantro from bolting. However, it is possible to slow it down by growing it in a partially shaded spot in the middle of summer when the heat is at its fiercest.

3) Dill

Dill may be handled similarly to cilantro, and dill seed heads - like coriander seeds - have culinary value, so allowing a portion of the dill patch to go to seed is perfectly fine. You can use the dill seed heads in pickles. You can also let them self-sow or preserve the fully-dried seeds for replanting in a paper bag.

4) Basil

For best results, plant basil multiple times (basically staggered planting, which we’ve already covered). You can clip plants to inhibit flowering, but freshly replanted basil plants usually have the finest flavor. Basil is a plant that thrives in the heat. Plant only when soil temperatures are firmly in the upper 50s, generally the latter week of May or the first week of June. The flavor of basil will be at its greatest immediately before it begins to blossom.

5) Cucumbers, zucchini, cantaloupes, and summer squash

Cucumbers, zucchini, cantaloupes, and summer squash yield their highest possible quality when thoroughly tended to. For the home gardener, a single plant or two —of any of them— is generally sufficient, but by growing it 2 to 3 times, spread out, you guarantee that the quality will always be excellent.

If you live in a warm climate area, June 1st (or the final week of May), July 1st, and July 15th are the ideal dates to plant these. Doing this will ensure you have a steady supply of excellent-quality veggies for an extended window. Just be sure to pick out and destroy any older pest or disease-prone plants.

After taking out the older, less healthy, less robust plants, you’ll find that pest issues will significantly decrease. You can compost these pest-and-disease-prone plants, but only if you’re sure your compost will get really hot and be under careful management. You can also utilize that extra, opened up planting space to grow a fast-growing crop like herbs, lettuce, greens, onions, or fennel, which will be done growing and out of the way by the time you want to plant a fresh round of these veggies.

6) Arugula, mustards & other salad cutting greens

Weekly or biweekly seeded or transplanted arugula, mustards, and other salad greens will produce the best results. You can sow a small amount of these crops adjacent to the transplanted plants, so you have two generations at the same time, allowing you an extended harvest. This lets you have lesser volumes arrive at different times, ensuring you don’t get overwhelmed by your harvest.

7) Broccoli

Broccoli provides you with multiple alternatives. It grows best when transplanted, and you can plant it three times in the spring and three times in late summer to ensure a continual yield.

For spring plantings, go with late April, early May, and mid-May, while for fall plants, go with early August, mid-August, and early September. The crops can be left in the ground to develop side shoots after you’ve harvested the full heads.

8) Green Beans

Green beans are at their tastiest when they are young and fresh. Green bean seed is very expensive, so it makes sense to rip out your old plants and use the seeds to make fresh plantings regularly. Smaller, multiple plantings will also mean that you won’t feel bogged down picking beans for hours on end. The best time to sow a fresh round of seeds is after the first generation has grown to about 6 inches tall.

9) Cabbage, Boc Choi, and cauliflower

You can have staggered plantings of Boc Choi, Cabbage, and Cauliflower. Cabbage withstands heat well and could be planted every few weeks from late April to early August. Cauliflower and Bok Choi are not quite as heat tolerant as cabbage, and you should plant them around the same time as broccoli (see above). Row covers, such as Reemay, are very effective in preventing flea beetles from destroying your young transplants. We shall cover row covers in detail in chapter 9.

10) Spinach

Spinach is another heat-resistant plant you can plant numerous times in the spring and late summer. Tended with a little straw mulch, it can even overwinter for extremely early spring consumption. You can plant spinach every week from mid-April to early June and then again from early August to mid-September. The final September plantings will be overwintered and ready to eat the following spring. Once the ground has frozen in December when winter is well and truly away, apply straw mulch to the overwintering spinach to ensure steady nourishment of your plants.

11) Carrots, beets, and turnips

You can plant beets, carrots, and turnips from seed every 2 to 3 weeks from mid-April through the third week in July. Carrots grown in the summer are not similar to those grown in the fall, and certain types perform better in the summer than in the fall.

Fall carrots have a sweeter flavor, so you may want to plant a bigger batch in the fall. Fall carrots also have lesser moisture content than summer carrots, so you can store them for the entire duration of winter without worrying about them going bad.

On the other hand, Summer carrots will almost certainly go bad if you store them throughout winter. Most gardeners ignore summer carrots in favor of fall carrots but what’s important is to prioritize what you enjoy eating most. If you prefer summer carrots to fall carrots, then set aside a larger gardening patch for them.

12) Celery and celeriac

Celery and celeriac are slower-growing vegetables that can be transplanted once or twice a week throughout the growing season, from mid-May to early July. These plants require a lot of water, and adding straw mulch to the soil will help keep the moisture uniformly distributed around their roots, ensuring that they grow unperturbed.

13) Bulb fennel and radishes

Bulb Fennel and radishes are quite similar to lettuce in that they’re transplantable every week if you so desire, but they bolt in the summer heat and thrive in the cooler months of the year. It’s best to plant them in late April or early June, and then once again in late August or the first week of September. They can withstand the cold and hold up nicely in the late fall.

Fennel is best transplanted, as opposed to planting from seed. Radishes are grown from seed. Straw mulch is greatly beneficial to fennel as it helps it grow larger roots by facilitating equal moisture around its roots.

14) Corn

Several corn plantings over many weeks are feasible, but a simpler technique is to plant everything at once, but with different corn varieties that mature at different times. The maturity time difference between the early and late variants can be as much as 40 days.

15) Peas

You can transplant peas each passing week of the year, but you will need to do a lot of irrigating, trellising, harvesting, and variety research. It is, nonetheless, doable.

In practice, a home gardener can seed two or three types in late April, with different maturity dates. Planting peas in the fall can lead to successful results, but this is, of course, weather-dependent. If you’re going to plant your peas in the fall, ensure you’re done planting by the middle of August before the cold gets really severe.

The following plant varieties (16-19) are generally planted once a year, but you can stagger the harvests by implementing the succession-planting strategies and methods covered in chapter 3 through 6:

16) Tomatoes, eggplant, and peppers

With tomatoes, peppers, and eggplant — try a few different kinds of each to avoid harvesting everything all at once. Determinate tomatoes will give you a large harvest all at once, which is ideal for folks who can or freeze large batches of tomato sauce. Determinate tomatoes are those that reach a specific height before maturing all at the same time.

On the other hand, indeterminate tomatoes grow continuously until frost arrives, with the fruit ripening progressively from August until the plant is killed by frost or disease. The latter will probably be a better choice for you if you’re a gardener who neither freezes them for tomato sauces nor sells them.

Once the soil warms up, you can transplant your peppers and eggplants, as they do best in warm soil. Typically, this will be in the first two weeks of June. A singular planting is generally more than sufficient, but different varieties will ensure a diverse, staggered, and certainly interesting harvest.

17) Potatoes and onions

Potatoes and onions are usually planted all at once, and having an assortment of varieties with different maturation dates will give you a longer window of fresh produce. Onions and potatoes call for cool and dark conditions for their preservation and will last for longer without going bad in the same. Both onions and potatoes are edible when young —as green onions or new potatoes, respectively. They can be picked, cured, and preserved for consumption all year.

18) Winter squash

Winter squash is yet another crop planted just once a year and then harvested and stored. Before eating, you should cure it for a week or two in a warm storage space.

19) Watermelons and cantaloupes

Watermelons are generally only planted once a year (early June is ideal). On the other hand, you can plant cantaloupes as late as mid-July.

With all these different plants covered, as well as what to do with them when practicing succession planting, the next chapter looks at extending the season and the different tips, tricks, and strategies you can use to prolong your harvesting season so that you enjoy fresh produce over a longer period.


Chapter 8: Extending the Season

Succession planting is a phenomenal tool that can help extend your growing season and, subsequently, your harvesting period. With the right planning, you can produce bigger yields not only throughout summer but into fall and even winter! However, to truly stretch your harvesting season past fall and into winter, you need to apply season extension techniques in addition to succession planting.

Mulching, cold frames, and greenhouses are all excellent and well-known season extension techniques. However, other techniques are not as well-known but are just as effective.

This chapter looks at 8 of the best season-extending practices for succession planters —complete with images for further illustration— that will make it possible for you to enjoy fresh veggies deep into winter.

1. Cold Frames

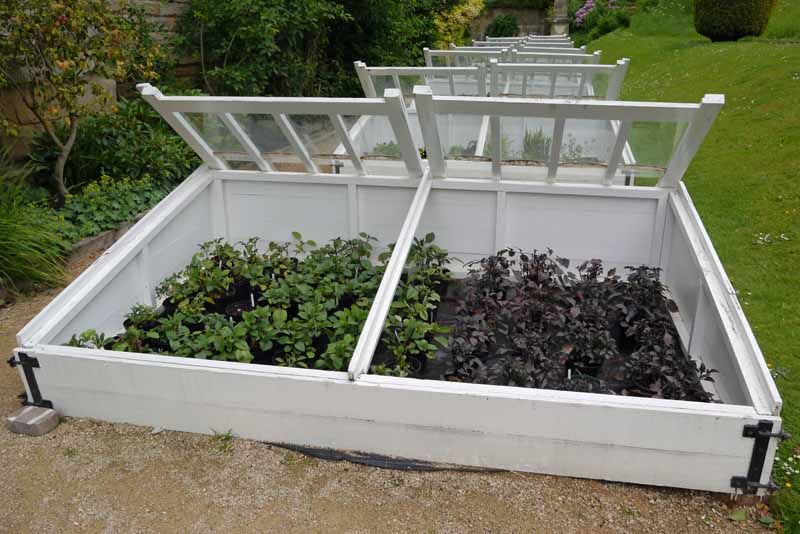
The best way to describe cold frames is that they are essentially very small greenhouses. Their small size makes it possible to have them either as mobile or stationary, which isn’t possible with greenhouses. The general cold frame design is a low-to-the-ground wooden base with a transparent top that’s easy to open and close.

They’re easy to make out of plastic or glass, and they fit over garden beds with ease.

TIP: Old windows make excellent cold frames. Rather than buying cold frames, utilize old windows to make some for yourself.

Once the weather starts getting frosty, simply place a cold frame over your garden beds to trap heat from the sun. This will keep the soil from freezing, ensuring that your plants keep growing for longer. Cold frames are especially useful for protecting your plants in early spring when late frosts are still a problem.

2. Hoop Houses

Cold frames are excellent season-extenders. However, their small size means they’re only practical with a small number of plants. If you have too many crops to fit under a cold frame, hoop houses make a great alternative to cold frames.

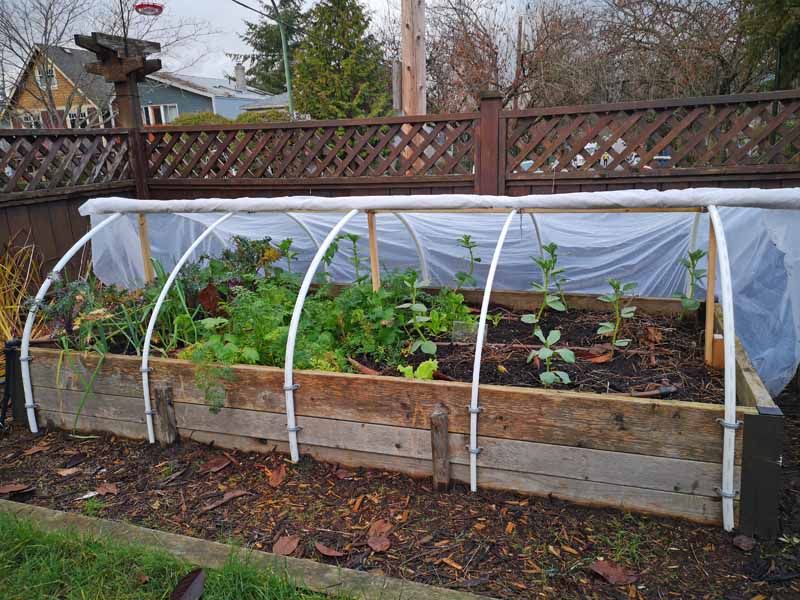
Hoop houses, also called high tunnels, are made up of a series of plastic, metal, or wood hoops coated in a thick layer of greenhouse plastic. Like cold frames, hoop houses trap heat from the sun, keeping plants safe in the colder seasons and the soil they’re growing in warm enough to sustain their optimal growth.

Many designs are designed so that the plastic can be easily rolled up in the warmer months, allowing for plants to grow all year under the hoop houses. With proper ventilation, you can keep your plants in your hoop house all year long.

Hoop houses are more practical than most other options, including cold frames, because they are larger and more functional for larger gardens. In addition to this, they are also relatively mobile, though not as much as the smaller cold frames are, and are very easy to build and install.

3. Greenhouses

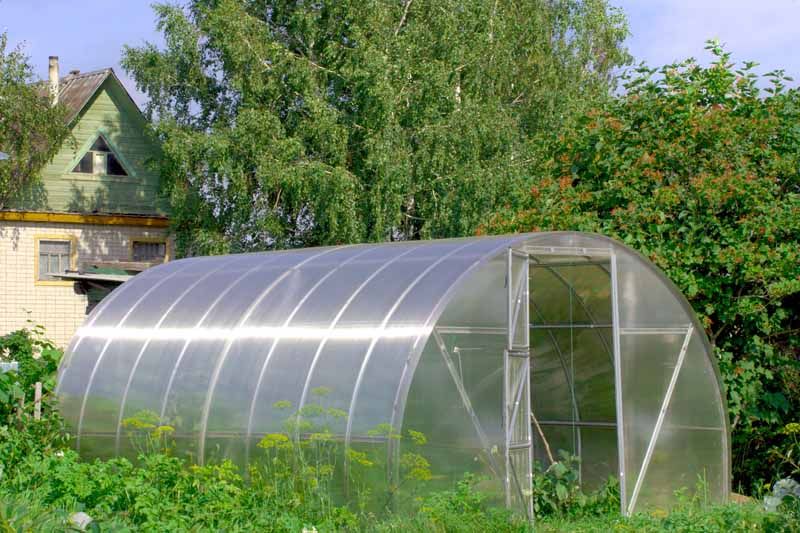
Do you want a more permanent setup than cold frames and hoop houses? If so, then greenhouses are your answer. Greenhouses are a lot more popular than every other option in this chapter, and chances are you’re well familiar with them. Greenhouses can be heated or unheated, large or small, DIY or purchased.

You can grow many crop varieties in heated greenhouses through the winter. However, even unheated greenhouses can be used to start crops in the spring and protect them from the fall cold owing to their ability to trap heat from the sun, thus keeping the soil from getting too frigid to support plants. Depending on the size and construction of your greenhouses, you can even plant directly in the ground inside them.

If you want a heated greenhouse without the propane bill, there are a variety of creative ways to maximize heat in a greenhouse. These include passive solar designs, radiant floor heating, and even placing large water drums along the back wall. The sun will warm the water, and the warm water will then warm the greenhouse, keeping temperatures high and the soil warm enough to grow plants.

4. Row Covers

Row covers, also referred to as floating row covers, are perhaps the simplest way to cover your crops, owing to how basic they are. A row cover is simply garden fabric draped and secured over plants to serve as a protective covering.

The fabric is draped directly over plants at times and wrapped around a series of hoops at other times, basically creating a mini-hoop house of sorts.

Row covers are simple to use and are a low-cost way to extend the growing season. Row covers can also help protect cooler-season crops from heat and pests, in addition to protecting them from the cold.

Because garden fabric, such as polypropylene or polyester, is porous, row covers allow rain to pass through to the plants, unlike cold frames or plastic hoop houses. They are very easy to make, as all you need is a few small hoops and some garden fabric.

5. Choosing Appropriate Fall Crops

Your choice of plants matters a whole lot when it comes to extending your garden season into the fall. Some plant species fare far better than others in cooler temperatures.

Slow-growing, heat-loving crops such as peppers and tomatoes thrive in the summer heat, and they likely won’t last very long once the weather turns cold. As such, you should not plant these plants if you want to have a fresh supply through winter.

Here’s a tip that could be very useful for you – plants generally planted in the spring also do well when planted in the middle of the summer for a fall harvest. This means you can stagger plant them from springtime all the way to mid-summer, thus ensuring you have an extended harvest through fall.

6. Mulching

Mulching, like greenhouses, is a very popular season-extension technique that you’ve likely read up on or heard about many times. It is beneficial to the garden for a variety of reasons. It suppresses weeds, regulates soil moisture, helps prevent erosion, and improves soil structure.

It’s also great for keeping the soil warm, thus ensuring your crops keep growing when the weather gets colder. Soil temperatures can be kept warmer for even longer by mulching using a thick layer of straw or hay.

Some cold-tolerant crops can even be left in the ground and harvested throughout the winter if adequately protected by a thick, two-foot layer of mulch.

7. Microclimate Observation

It’s crucial to know your USDA planting zone, which will help you figure out what crops you can grow and when the best time to plant them is. However, getting even more precise with your climatic and planting zone data will be even more beneficial in knowing the ideal crops and the best times to plant them in your backyard. Enter the microclimate phenomenon.

A microclimate is the climate of a very small or very specific location that differs from the climates of the surrounding areas. And by very small, we mean very small – like a certain portion of your home garden.

One side of your home garden, for example, may receive more sunlight than the other and may even be shielded from the heavy wind by a row of trees as a bonus. This particular microclimate may not freeze or frost as rapidly as the section of your garden that receives less sunlight and remains unshielded by trees.

By carefully analyzing microclimates in your veggie patch over time and perhaps recording detailed notes frequently, it becomes a lot easier to alter your garden layout to maximize the potential use of space. You could perhaps open up possibilities that may have otherwise appeared unachievable before.

You may be very surprised to discover that the plant that could never withstand the moisture and temperature fluctuations of your backyard thrives for a much longer time in a different location that’s mere meters away.

8. Raised Beds

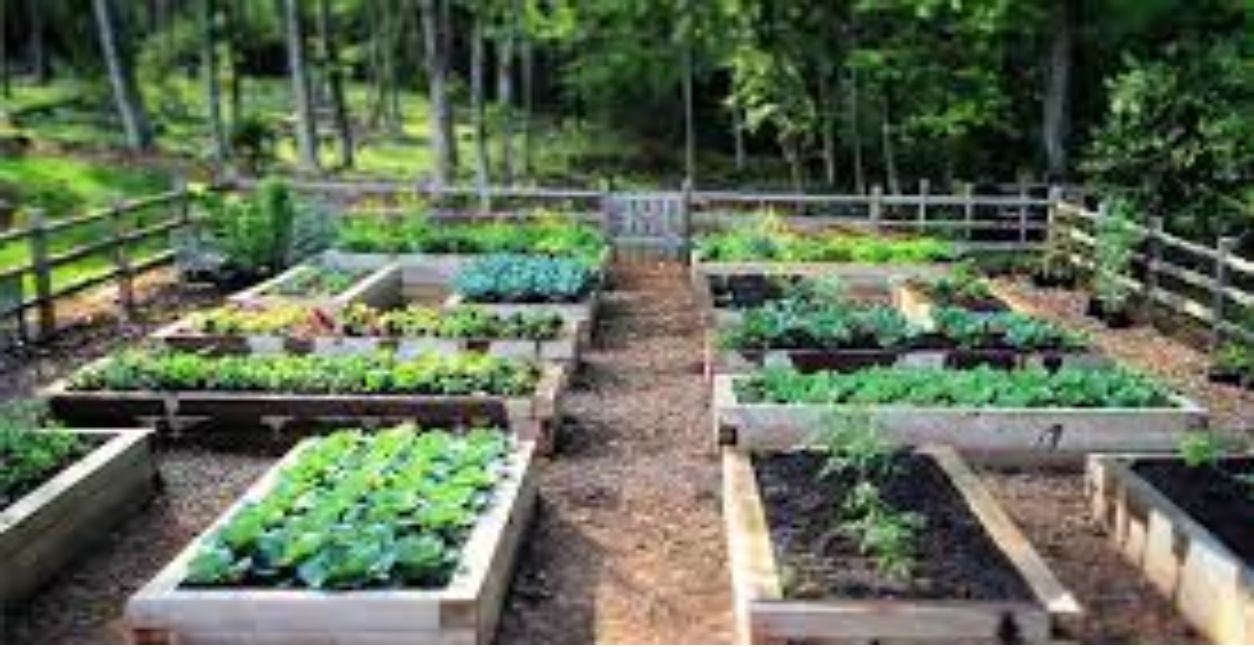
Raised beds are soil mounds that sit above ground level and, usually, they’re enclosed in a frame made of wood, cinder blocks, rocks, or other materials.

The soil in raised beds dries and heats faster than the ground level soil because of the elevation. Raised beds can help extend your harvest season by warming up earlier in the spring and staying warmer later into the fall.

Another advantage of raised beds is that they are simple to cover with cold frames or row covers, extending the growing season further.

As an added benefit, because raised bed soil does not compact, it does not need to be turned or tilled as frequently as ground-level soil does, reducing the number of weed seeds that reach the surface, thus lowering the maintenance measures you have to take.

Next up, we look at what has been a buzzword in the gardening world for decades: the square foot garden, a revolution in small space gardening everywhere.

Chapter 9: Square Foot Gardening

The last chapter talked about combining succession planting with season-extension techniques to extend your harvesting season, in some instances through winter. This chapter will cover maximizing space and crop variety, and the best way to achieve this is to combine succession planting with square foot gardening.

It has been a buzzword in the world of gardening for decades now: the square foot garden, a revolutionary technique in small space gardening that’s applicable anywhere and by everyone. Going by its name, it takes very little imagination to figure out what this basic concept entails. It involves carefully measuring

It doesn’t take much imagination to figure out that this concept involves carefully measuring small, even gardening plots and then carefully parceling out each plot for either a separate crop variety or a specific number of one plant variety. However, a more formal, more in-depth description is required to grasp this concept truly. Here is a detailed description of this small space gardening concept:

What is Square Foot Gardening?

Square foot gardening is a straightforward way of growing compact, well-organized, and super productive home gardens. Mel Bartholomew, a backyard gardener, former engineer, and efficiency expert, developed this method as a superior way to grow veggie gardens. It was instantly a tremendous hit when he presented it to the gardening public in his book Square Foot Gardening in 1981.

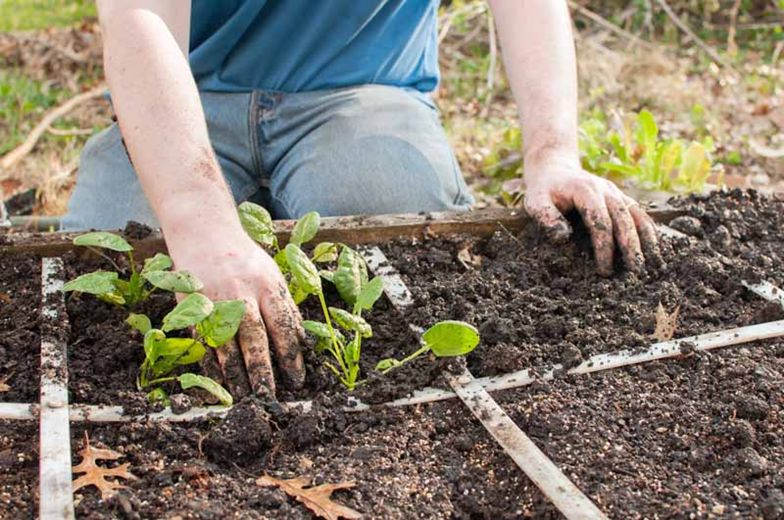
The fundamental idea of this gardening concept is this: Make a small garden bed (4 feet by 4 feet, or 4 feet by 8 feet are the most common sizes) and partition it into a grid of 1-foot squares that you manage separately.

Each vegetable’s seeds or seedlings are planted in one or more squares, at a density determined by plant size (for example, 16 radish seeds per square vs. one tomato plant per square). Since there are no paths to eat up space, there is no wasted space. The soil in the bed can also stay loose throughout as you never step on it.

The Basic Setup

Square foot gardening has a relatively long and storied history in the gardening industry, with numerous, easily observable gardening and lifestyle perks.

But what are the unique approaches that provide such amazing results?

They are, at their core, quite fundamental and ridiculously easy to grasp:

1. Get Your Grow Space

The first step is to build (or purchase) a four-by-four foot raised bed box. If you want to build on top of other soil and have fewer weeds, line it up using a fabric weed barrier.

2. Put soil in

Fill your bed box with fertile potting soil (part compost, peat moss, and vermiculite, or some other mix that you know will work just fine.) Make sure it’s weed-free to avoid a scenario where you’re grappling with weeds right off the bat.

3. Lay Out the Grid

You can space the plants by overlaying a square foot grid on top of the bed box. Once you do this, you can go straight to planting your seeds.

4. Get Growing!

We all know it; water, grow your plants, and presto!

All of these steps appear really straightforward, right? If you’ve been doing home gardening for any time, there really isn’t anything new here —well, besides the square-foot grid.

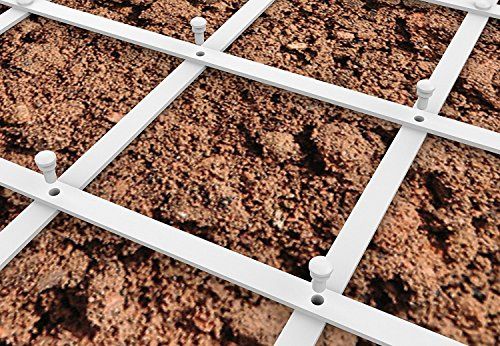
This grid is typically an easy-to-make, DIY measuring tool built from long, thin wood slats (especially lath) that are then cross-hatched and made into foot-sized squares.

This grid is then attached to 4-by-4-foot wooden beds (we highlighted this in the basic setup part) and used to gauge and designate specific 1-by-1-foot growing areas for herbs, vegetables, and other plants of your choice.

If you are not exactly a handyman (or handywoman), these grids, mostly composed of fiberglass, are easily available for purchase on Amazon.

Really though, building your wooden lath is so easy to do. And if you’re not sold on your handyman (or handywoman) chops with wood, simply use a temporary string-and-post setup to cast your measurements instead of wood.

Benefits of Square Foot Gardening

What are the advantages of square-foot gardening? What makes it a desirable approach to home gardening?

This perennial gardening system is the ideal food-growing alternative for the backyard gardener, or even the newcomer to urban homesteading, for a variety of reasons:

  • You get to grow as much within a limited space as you would in a conventional row-planted garden.
  • The nature of the 4-by-4-foot raised bed garden is idea since it makes it very easy to access
  • There’s no need to have a large yard when you can grow food on your patio, balcony, or even a small plot with this method.
  • There is no weeding needed at all (well, assuming you ensured the soil you put in was weed-free)
  • There is less labor and thus less strain on your body, owing, in part, to the lack of weeding.
  • There are no negative effects or damage to your yard.
  • It’s quite simple to set up, making it ideal for beginner gardeners.
  • By sourcing your food, you can save money while reducing your management time. That’s right: with this innovative gardening method, you’re essentially sourcing substantial amounts of food from really small spaces, something that would otherwise not be practical without this method, allowing you to save grocery money while putting in minimal effort!
  • You do need to lease a tiller to prepare your ground. This one is self-explanatory.
  • Because of the tight, compact, yet healthy spacing used in this system, you will produce as much food as you may have in a bigger space if you used less-space efficient, row-crop methods.
  • Traditional row-cropping ensures healthy plants with plenty of room between rows, but square foot gardening prompts the question: couldn’t more plants be grown there as well? Plus, in a 4-by-4-foot raised bed structure (the method’s normal raised bed dimensions), you won’t have to put in nearly as much effort as you would in a bigger plot’s in-ground planting.

Growing on the Grid

The grids create the magic of the square foot gardening concept, and they’re responsible for the greater ease in growing your plants.

It’s all quite simple: within each square, you will plant a specific veggie variety in precise amounts (the number varies depending on the plant and the size it grows to, as we mentioned earlier) with appropriate spacing between each plant. This optimizes each individual plant’s area and nutrient utilization while crowding and pushing out weeds as a living mulch, allowing you to grow more vegetables in a smaller space and even enhancing plant health via companion planting (this will be covered later in this chapter.)

Depending on the kind of veggie, herb, or even fruit you’re planting, you’ll only need to focus on planting a certain number of your seeds or seedlings in each square, in a continuous grid-like spacing – the grid will do the rest for you, including keeping your rows neat and sharp.

Simply put, all you need do is to figure out how many plants you’ll need per square, plant them, and ensure they’re spaced properly in their particular grid within the larger grid (comprised of all the 4-by-4-foot grids in your setup).

It really is wonderfully easy, which is undoubtedly a major reason why the method has become so popular.

The general number/quantity and spacing criteria for the most common veggies you may be interested in planting in your square foot garden are below.

1-Per-Square Plantings

For the plants listed here, simply make one hole right in the center of one of your grid squares and plant your seeds or transplant your seedling. With this done, move on to the next grid and rinse and repeat. You should only plant one per square because they tend to sprawl as they grow, taking up quite a lot of space.

  • Celery
  • Eggplant
  • Lettuce (head)
  • Corn
  • Kale
  • Okra
  • Oregano
  • Sweet potatoes
  • Parsley
  • Potatoes
  • Peppers
  • Rosemary
  • Tomatoes (staked)


2-Per-Square Plantings

For the plants listed below, you will plant them side by side within one square, ensuring you considerable space between each plant. Unlike the plants mentioned above, these do not take too much space. Nevertheless, you should not plant more than two in each grid.

  • Winter squash
  • Cantaloupe
  • Pumpkins
  • Cucumbers
  • Watermelons

(Up to) 4-Per-Square Plantings

You should plant these in a square, with each seed or seedling forming one of the 4 corners. You place them at equal distances from each other and the grid’s border, with each hole close to each corner of the grid.

You do not have to plant 4 per square. If you want to grow a little less food, feel free to plant less per square.

  • Basil
  • Kohlrabi
  • Swiss chard
  • Summer squash (with cage)
  • Garlic
  • Leeks (for growing larger plants)
  • Rutabaga
  • Onions (for growing larger bulbs)
  • Lettuce (leaf)
  • Winter radishes
  • Zucchini (with cage)
  • Tomatoes (with cage)

(Up to) 8- or 9-Per-Square Plantings

Plant these in a square-like pattern within your grid (that is, 3 plants long by 3 plants wide, forming either a square or a square-shaped ring-border. Make sure they are equidistant from each other, as well as to the grid border.)

Like four-per-square plantings, do not feel pressured to plant 8 or 9 of each if you want less food.

  • Green beans (bush or pole)
  • Cilantro
  • Onions (smaller but more plants)
  • Beets
  • Tomatoes (with no supports)
  • Garlic (smaller bulbs harvested, but more plants)
  • Leeks (smaller but more plants)
  • Spinach
  • Peas
  • Turnips

(Up to) 16-Per-Square Plantings

Plant these in a square pattern within each square space ((i.e., a maximum of four plants long by four plants wide). Ensure they are equidistant from each other and the grid border to avoid crowding. Again, feel free to plant less if you want a smaller harvest coming in. You may even prefer to use the 8- or 9-per-grid spacing method.

  • Parsnips
  • Carrots
  • Radishes

(Up to) 2-Per-4 Planting Squares

Yes, you read that right – two plants per four planting squares. These veggies need LOTS of space to grow optimally, and you need a more complex setup of the square grid method than other crops. Depending on how many plants you want to plant, ensure they have sufficient space from one another and the grid sides.

  • Cauliflower
  • Broccoli
  • Cabbage
  • Brussels sprouts

What About Perennial Veggies?

Unfortunately, some veggies, particularly perennials that require greater space to thrive, aren’t suited for the square foot garden. These plants’ foliage gets far too large and causes too much overshadowing to be grown in a garden as a companion plant with other vegetables.

These include:

  • Rhubarb
  • Artichokes
  • Asparagus

Full-grown asparagus ferns would fall over onto other plants, and the same would be the case with the growth of rhubarb and artichokes.

Fancy Footwork

Another unique element of this gardening method lies in how you plan your growing space. More specifically, it depends on where every veggie goes within the space to reap maximum benefits out of your small home garden.

Such techniques as companion planting are a huge part of this. Companion planting references the mutually beneficial inter-planting of varied plant species with one another for natural perks like disease prevention and pest resistance.

Within your 4-by-4-foot grid, carefully pick the plant kinds you want to plant together to ensure they grow harmoniously and even aid each other to grow stronger and produce higher-quality yields.

Square Foot Layout Tips:

Here are some tips you can use, combined with the grid setup guidelines outlined above, to plan which grids will be best for which crops, especially if your plan is to plant many different pant varieties.

1) Avoid Monoculture

Plant a range of mutually beneficial plants in your square foot garden, as planting one plant variety close together tends to attract more diseases and pests.

2) Keep Height in Mind

When planting short sun-and heat-loving plants with taller ones, plant your taller vegetables (e.g., peppers, tomatoes, and eggplants) on the north side of your bed so that the shorter ones (such as celery, bush beans, and basil) can get their fair share of the sun’s rays, 

If you’re combining tall plants with a mix of shade-and heat-loving ones, however, have your tall ones in the middle, and plant your shade-loving plants on the north side and heat-loving plants on the south.

3) Border with Veggie Protectors!

You must border your growing space with alliums (with the examples of leeks, garlic, onions, and shallots) since these are very effective in repelling pests and insects. However, keep your alliums far from beans because alliums produce an antibacterial that kills the bacteria on the roots of beans, halting their nitrogen-fixing capacity.

You’re now familiar with the most important aspects, strategies, techniques, and tricks needed to make your succession planting foray a success without needing much trial and error. The next chapter, the final one, builds on this one and covers the dos and don’ts of succession planting.

Chapter 10: Succession Planting Dos and Don’ts

While succession gardening comes with a whole host of advantages, one potential drawback is overtaxing your soil. Because the soil does not get a lengthy amount of time to sit, unplanted, and replenish its nutrients, succession planting can be hard on your soil with time.

This chapter highlights some dos and don’ts of succession planting to keep your soil virile, your yield high, and the quality of your produce perpetually top-level.

Succession Planting Dos and Don’ts

  1. The first paragraph mentions how succession planting can be hard on your soil after a while. To avoid nutrient depletion, ensure you always enrich your soil with organic material between your plantings. Mulch liberally too, and rotate your crops whenever possible. If you can, it is also good to occasionally leave your bed fallow and seed it with cover crops.
  2. Avoid replanting the same crop or crops similar to them in areas experiencing disease or pests.
  3. Remove any plants that have outlived their usefulness (basically, past their prime) so that you can use the space for anything else. These plants you’ve removed in the compost bin and compost them so that you can re-inject those valuable nutrients in the soil.
  4. Composting in place or simply leaving removed plants on the garden bed to decompose directly in it also helps replenish nutrients in your soil. However, doing this with diseased plants will only give rise to more problems, so avoid leaving those on the bed to decompose.
  5. Start your transplants in pots or flats if possible while you wait for a crop to finish in your garden. The new crop will have a considerable head start when you’ve cleared the necessary space to plant it.
  6. Choose plant varieties that mature quickly; that way, you can harvest quickly and plant some more. However, this will depend on your harvest desires. If you don’t need a lot of produce coming in a short time, you can eschew this piece of advice.
  7. Keep records of your succession planting activities! Keeping track of when and where you plant anything, and making notes in your planner reminding you to reseed every few weeks, will keep you comfortably on top of things.
  8. Interplant but do not overplant.  Pay close attention to a given crop’s projected maturity size and spacing recommendation. Planting too densely will negatively affect the productivity of certain crops if you intersperse your plants as you wait for full maturity or experiment with tighter-than-recommended planting.
  9. Broccoli is an excellent example of this. The heads of your broccoli plants will be stunted if packed too close to each other to accommodate their fully mature size. Their spacing has a direct correlation to their yield as well. So, if you want to try experimenting with your plantings, do some homework first and keep track of your results, good or bad, throughout the season. This way, you’ll know what works and what doesn’t in the future.
  10.                      Only bite off what you can chew. Will you want to eat carrots for 16 weeks in a row? Will you be able to devote enough time and attention to harvesting and replanting fast-growing varieties over and over again throughout the year? Be realistic about your lifestyle and how much time and energy you can devote to your garden. Gardening is hard work, but it should be a pleasure too. Always strive to maintain a balance of benefits over effort.
  11.                      Focus mostly on growing plants you love. Don’t limit yourself to growing “the usual suspects” because that is what everyone else grows. Above all, consider the veggies you like having on your plate and give them priority in your garden. If nothing else, you’ll at least be looking forward to each successive harvest as you genuinely enjoy eating them.

Conclusion

As you’ve already deduced by now, succession planting is a wonderfully simple practice with a straightforward set of guidelines that just about everyone can implement.

The best part is that you need very little space to produce a respectable harvest. If you follow the advice in this book closely and don’t get too ambitious with your plant spacings, you’ll have way more successes than failures.

Speaking of success and failure:

As a gardener, you must understand that there will always be failures no matter how long you’ve been doing it and how refined your methods are. Succession planting is no exception. However, failure will be your best teacher here. The only failure that will bring you no benefit whatsoever is the failure to start. So, get started!

Even with a guide as well put-together as this one, failures will be inevitable, so embrace them, along with the joys of success that will come too. With more experience, you’ll make fewer mistakes and be a lot more precise with your succession planting practices.


PS: I’d like your feedback. If you are happy with this book, please leave a review on Amazon.

Please leave a review for this book on Amazon by visiting the page below:

https://amzn.to/2VMR5qr